
JobDiva Integration
We’re excited to announce a new integration with JobDiva, a leading Platform as a Service (PaaS) technology for the staffing industry.
Integration Overview:
- RefAssured reference activities are now visible directly within JobDiva candidate profiles under Notes.
- Completed reference reports are appended as notes to each candidate’s profile for easy access and documentation.
- When a reference-giver opts in as a potential talent lead, RefAssured will automatically create a new candidate record in JobDiva if one does not already exist. If the individual is already in your system, a note will be added to their existing profile. The requestor and other team members added to receive candidate leads will always be notified via email with the subject line "New Candidate Opt-In! Reference name - their current job title and company" and will include a direct link to the candidate profile.
- We’re currently developing similar functionality for sales lead tracking—stay tuned for updates.
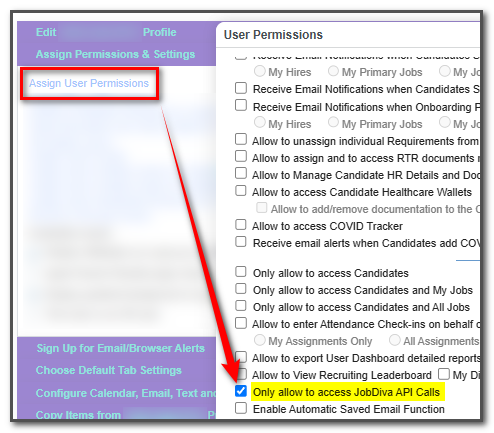
Create an API user in JobDiva
- Sign in to JobDiva as an administrator
- Navigate to Settings → My Team → Add User
- Enter details for a new user account designated solely for API integration (e.g., name it “API‑User”)
- Ensure only “Only allow to access JobDiva API Calls” is selected and all other User Permissions are deselected.
- Email: api@refassured.com
- Endpoints Required: Please note, with the exception of attaching notes to existing profiles, we do not update any profiles in your instance. For all Candidate Opt-ins and Sales Opt-ins we will only create net new records where they do not already exist in your ATS using a duplicate check.
- apiv2/validateUser
- apiv2/jobdiva/quickCandidateProfileSearch
- apiv2/jobdiva/searchCandidateProfile
- api/jobdiva/SearchContacts
- apiv2/bi/CandidatesSubmittalsDetail
- apiv2/bi/JobsDetail
- apiv2/bi/CandidateDetail
- apiv2/jobdiva/createCandidateNote
- apiv2/jobdiva/createContactNote
- apiv2/jobdiva/createLead
- apiv2/jobdiva/createContact
- api/jobdiva/uploadCandidateAttachment
- apiv2/bi/UserDetail
- apiv2/bi/UsersList
- apiv2/jobdiva/createCandidate
- apiv2/bi/ResumeSourceList
- apiv2/checkJobDivaSession
- apiv2/bi/UserfieldsList
- apiv2/v2/login
- apiv2/v2/apiRefreshToken
- Save and provide API Username, Password, and Client ID to RefAssured Team
- Save and provide API Username, Password, and Client ID to RefAssured Team
- If any information is needed, please contact support@refassured.com
Once the API user is created in JobDiva, add a resume source of "RefAssured" within JobDiva
- Access Settings → Connect → Resume Parameters → Manage Resume Sources → Add "RefAssured"
- One complete, please inform RefAssured Team.
To enable the fully embedded JobDiva experience, you'll need to:
-
Step 1: Locate Your RefAssured API Key
- Log in to the Full RefAssured App View as an Admin.
- Navigate to Settings → ATS Integration → JobDiva.
- Copy your API Key.
-
Step 2: Enter the API Key in JobDiva
- A Team Leader (Admin) in JobDiva should go to: Settings → My Team → Profile
- In the Features section, locate Manage RefAssured.
- Paste the API Key into the designated field.
-
Step 3: Confirm User Permissions
- Ensure that the correct team members have the “Allow to access RefAssured” User Permission enabled.
- Users with this permission will see the RefAssured tab on each Candidate record.
-
Step 4: Verify Access
- Open a Candidate record in JobDiva.
- Confirm that the RefAssured tab appears and is accessible.